在上一篇ELK安装测试的时候有下面这句:
input { stdin { } } output { stdout {codec =>rubydebug} }
通过stdin{}读取cli的输入,然后以rubydebug输出到cli
上面就是一个简单的logstash配置文件。
下面以我收集ASA的日志为例,分析下配置文件的写法
首先是在ASA上配置syslog server
ASA的syslog配置
1
2
3
4
5
6
7
8
| logging enable
logging timestamp
logging list VPN-USER message 302013
logging list VPN-USER message 113039
logging list VPN-USER message 113019
logging trap VPN-USER
logging facility 22
logging host inside x.x.x.x
|
logging list定义了要传送给syslog server的日志列表,我找个几个有关SSLVPN的log message定义:
| message ID |
内容 |
备注 |
| 113039 |
VPN user成功登陆 |
包含username,group-policy,remote-ip |
| 113019 |
VPN user注销 |
同上 |
| 302013 |
VPN user发起一个TCP连接 |
包含username,src-ip,dst-ip等 |
| 302014 |
VPN user结束一个TCP连接 |
同上 |
| 302015 |
VPN user请求udp |
同上 |
| 302016 |
VPN user接收udp |
同上 |
| 302020 |
VPN user发起ICMP |
同上 |
| 302021 |
VPN user接收ICMP |
同上 |
更多ASA LOG message对应信息请查询思科官网文档
除了list以外,logging trap也可以根据不用的日志等级来过滤发送,常用的是logging trap informational
各个等级的大致描述如下
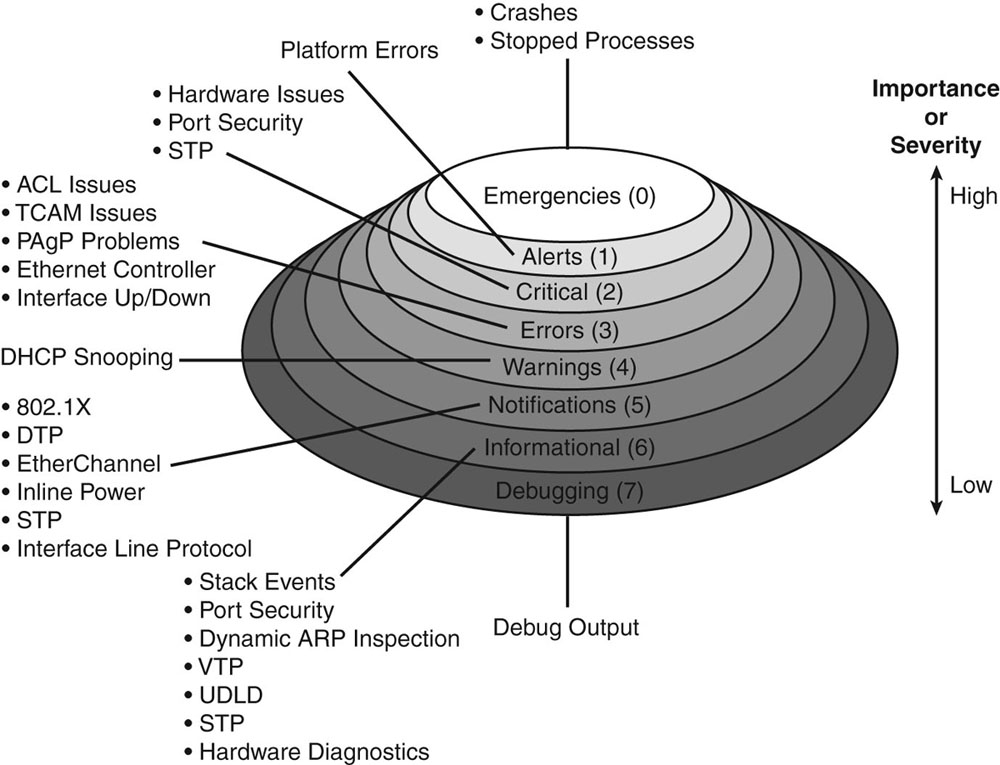
此外,还有一条logging facility 22
facility用于区分不同类型的设备或进程产生的syslog,思科建议设置为21,22或23
这个值用于计算syslog的优先级,Priority = Facility * 8 + Level
logstash的配置
logstash的配置文件包括三个部分:input, filter, output.
详解如下:
1
2
3
4
5
6
| input {
udp {
port => "514"
type => "cisco-fw"
}
}
|
udp是指数据源的类型,还可以是从文件读取的file等
port => "514"代表运行时监听udp514(默认sysLog端口),如果要指定tcp协议,将上面udp替换为tcp即可。
type => "cisco-fw"区别于其他数据源,指定一个type,用于后面filter中的if匹配
filter:解析数据格式
filter负责将日志解析为key-value的字段,其格式可以形容为伪代码吧,其中有一些特定的内置函数。
我的filter中主要有grok,syslog_pri,geoip,mutate这4部分。
(这里我解析了302013和113039的日志,其他日志只存储)
1
2
3
4
5
6
7
8
9
10
11
12
13
14
15
16
17
18
19
20
21
22
23
24
25
26
27
28
29
30
31
32
33
34
35
36
37
38
39
40
41
42
43
|
filter {
if [type] == "cisco-fw" {
grok {
match => ["message", "%{CISCO_TAGGED_SYSLOG} %{GREEDYDATA:cisco_message}"]
}
syslog_pri { }
if [ciscotag] == "ASA-6-302013" {
grok {
match => [
"cisco_message", "%{CISCOFW302013_302014_302015_302016}"
]
}
}
if [ciscotag] == "ASA-6-113039" {
grok {
match => { "cisco_message" => "<(?<groupname>[\w\-]+)>\sUser\s<(?<usrename>[\w\-\./@\\]+)>\sIP\s<(?<ipaddr>[\d\.]+)>\sAnyConnect\sparent" }
}
if [ipaddr] != "172.17.0.1" {
geoip {
source => "ipaddr"
target => "geoip"
database => "/opt/logstash/databases/GeoLite2-City/GeoLite2-City.mmdb"
add_field => [ "[geoip][coordinates]", "%{[geoip][longitude]}" ]
add_field => [ "[geoip][coordinates]", "%{[geoip][latitude]}" ]
}
mutate {
convert => [ "[geoip][coordinates]", "float"]
}
}
}
mutate {
remove_field => [ "message" ]
}
}
}
|
下面对结合例子对着5部分进行分析,以ASA-6-302013这条日志为例:
1
| <182>May 07 2018 13:26:42: %ASA-6-302014: Built inbound TCP connection 76009711 for inside:172.17.44.167/54514 (172.17.44.167/54514)(LOCAL\\xiaoming) to inside:192.168.115.37/5061 (192.168.115.37/5061) (xiaoming)
|
Grok
Grok使用特定的patterns(内置或者是自定义的正则)来匹配日志中的各种元素,并提取到指定字段里。
上面第一个if内的CISCO_TAGGED_SYSLOG就是logstash中内置的一个patterns,它的作用是取得这条日志的优先级syslog_pri,时间戳timestamp,产生日志的主机sysloghost(可选)和日志类型ciscotag。对应匹配表达式是这样的:
1
| CISCO_TAGGED_SYSLOG ^<%{POSINT:syslog_pri}>%{CISCOTIMESTAMP:timestamp}( %{SYSLOGHOST:sysloghost})? ?: %%{CISCOTAG:ciscotag}:
|
有关logstash内置的匹配patterns,可以在官方源码中查看:github链接
所以,上面的日志经过第一个Grok解析生成以下字段:
1
2
3
4
| syslog_pri = 182
timestamp = May 07 2015 13:26:42
sysloghost =
ciscotag = ASA-6-302013
|
剩余的部分*”Built inbound TCP… (xiaoming)”会作为cisco_message,用于后面%{CISCOFW302013_302014_302015_302016}*详细解析:
1
2
3
4
5
6
7
8
9
10
11
12
13
14
15
16
17
18
19
20
21
22
23
24
25
26
27
28
29
| {
"dst_ip": "192.168.115.37",
"syslog_pri": "182",
"dst_mapped_port": "5061",
"syslog_facility_code": 22,
"type": "cisco-fw",
"ciscotag": "ASA-6-302013",
"cisco_message": "Built inbound TCP connection 76009711 for inside:172.17.44.167/54514 (172.17.44.167/54514)(LOCAL\\xiaoming) to inside:192.168.115.37/5061 (192.168.115.37/5061) (xiaoming)\n",
"timestamp": "May 07 2015 13:26:42",
"syslog_severity_code": 6,
"src_port": "54514",
"syslog_severity": "informational",
"src_mapped_port": "54514",
"syslog_facility": "local6",
"dst_port": "5061",
"dst_mapped_ip": "192.168.115.37",
"src_fwuser": "LOCAL\\xiaoming",
"src_ip": "172.17.44.167",
"host": "172.17.0.17",
"@timestamp": "2015-05-07T13:26:05.652Z",
"src_interface": "inside",
"dst_interface": "inside",
"src_mapped_ip": "172.17.44.167",
"protocol": "TCP",
"@version": "1",
"action": "Built",
"direction": "inbound",
"connection_id": "76009711"
},
|
syslog_pri
syslog_pri的作用是从syslog中解析PRI(优先级)字段,如果没有设置该优先级,默认为13.
之前在ASA有配置logging facility 22,前面介绍过。就不多说了
根据公式,facility,level和Priority的对应关系如下:
1
2
3
4
5
6
7
8
9
10
11
12
13
14
15
16
17
18
19
20
21
22
23
24
25
| emergency alert critical error warning notice info debug
kernel 0 1 2 3 4 5 6 7
user 8 9 10 11 12 13 14 15
mail 16 17 18 19 20 21 22 23
system 24 25 26 27 28 29 30 31
security 32 33 34 35 36 37 38 39
syslog 40 41 42 43 44 45 46 47
lpd 48 49 50 51 52 53 54 55
nntp 56 57 58 59 60 61 62 63
uucp 64 65 66 67 68 69 70 71
time 72 73 74 75 76 77 78 79
security 80 81 82 83 84 85 86 87
ftpd 88 89 90 91 92 93 94 95
ntpd 96 97 98 99 100 101 102 103
logaudit 104 105 106 107 108 109 110 111
logalert 112 113 114 115 116 117 118 119
clock 120 121 122 123 124 125 126 127
local0 128 129 130 131 132 133 134 135
local1 136 137 138 139 140 141 142 143
local2 144 145 146 147 148 149 150 151
local3 152 153 154 155 156 157 158 159
local4 160 161 162 163 164 165 166 167
local5 168 169 170 171 172 173 174 175
local6 176 177 178 179 180 181 182 183
local7 184 185 186 187 188 189 190 191
|
mutate
1
2
3
| mutate {
remove_field => [ "message" ]
}
|
如上所见,mutate可以增加和删除某个字段。支持remove_field, add_tag等
移除多余的字段可以有效的减小日志的字节数,更高效的存储。
GeoIP
用于获取ip地址的地理位置信息。
1
2
3
4
5
6
7
8
9
10
11
12
13
14
15
16
| if [ciscotag] == "ASA-6-113039" {
grok {
match => { "cisco_message" => "<(?<groupname>[\w\-]+)>\sUser\s<(?<usrename>[\w\-\./@\\]+)>\sIP\s<(?<ipaddr>[\d\.]+)>\sAnyConnect\sparent" }
}
geoip {
source => "ipaddr"
target => "geoip"
database => "/opt/logstash/databases/GeoLite2-City/GeoLite2-City.mmdb"
add_field => [ "[geoip][coordinates]", "%{[geoip][longitude]}" ]
add_field => [ "[geoip][coordinates]", "%{[geoip][latitude]}" ]
}
mutate {
convert => [ "[geoip][coordinates]", "float"]
}
}
|
这里主要对113039中的remote-ip进行解析。logstash内置的表达式中没有对ASA-6-113039日志的匹配。
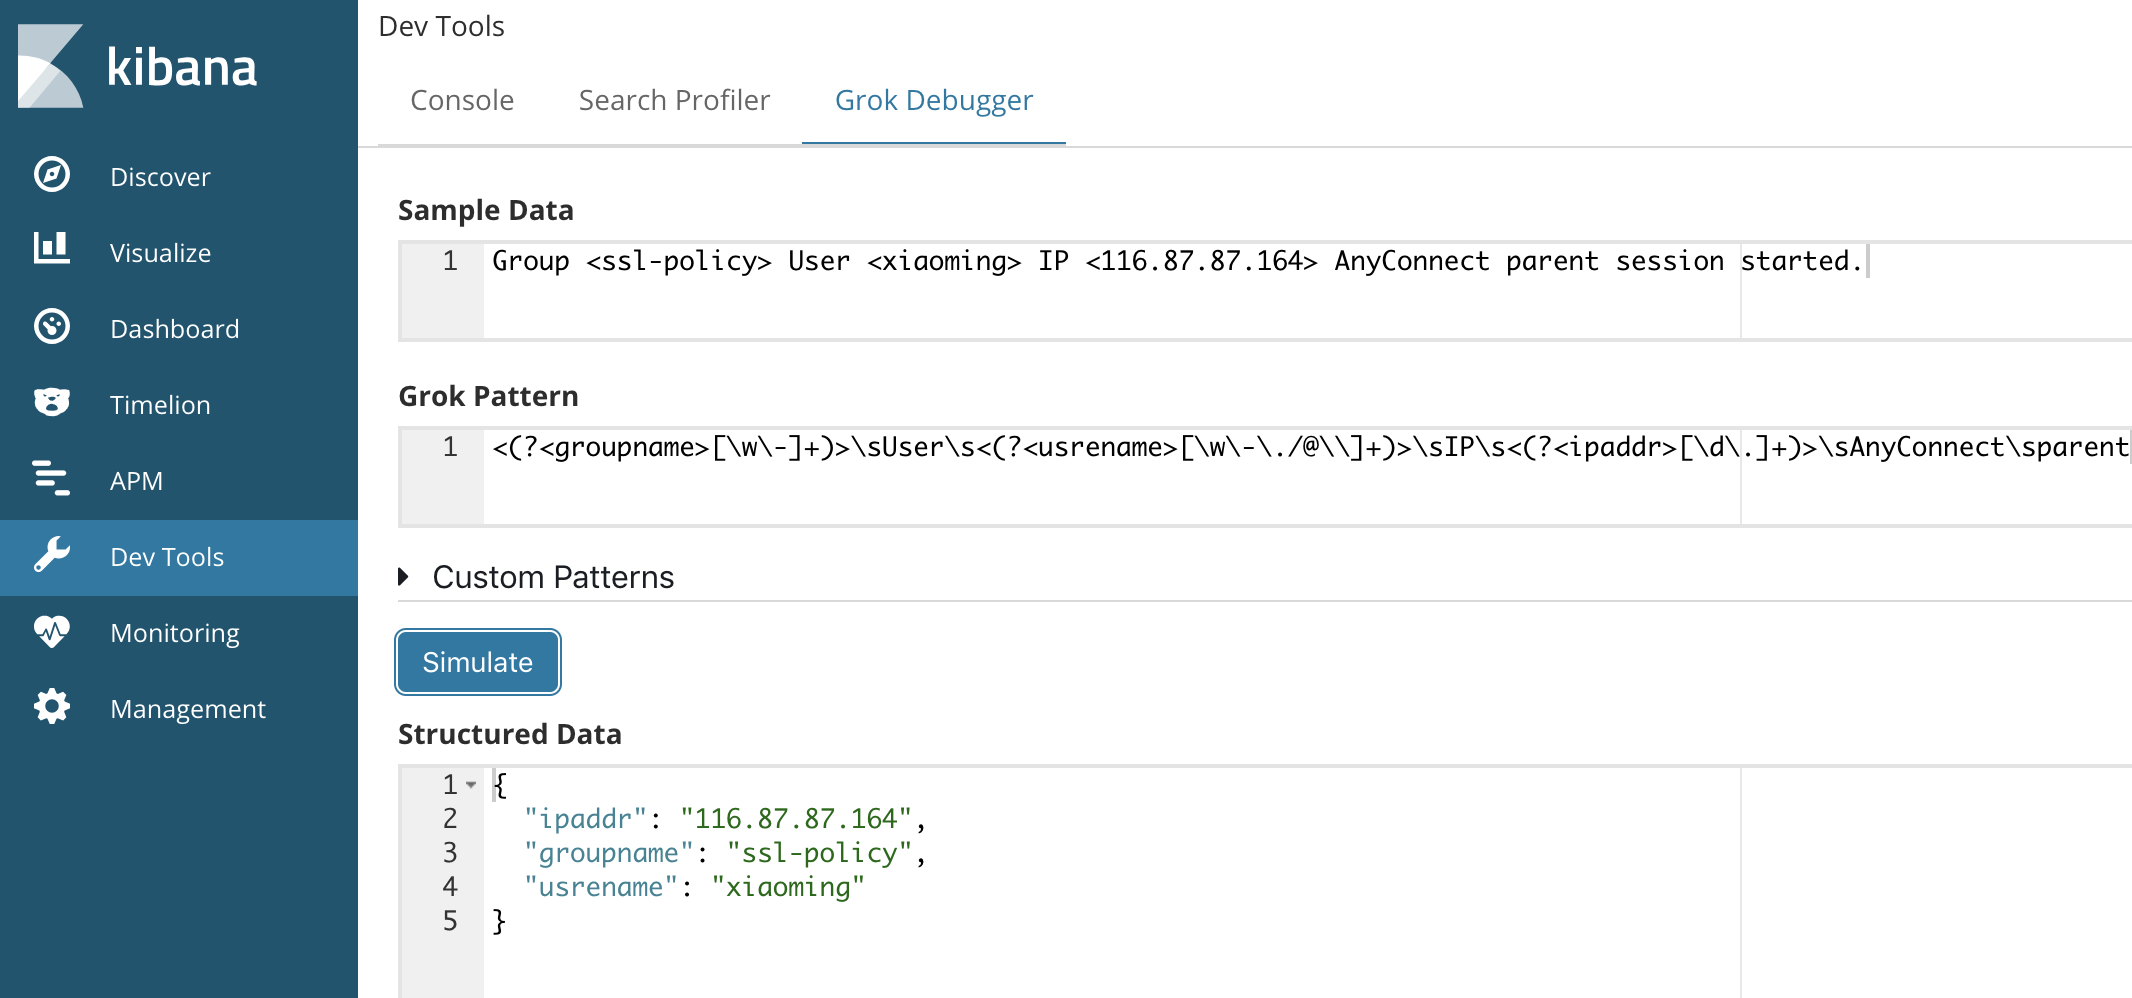
一条ASA-6-113039的日志经过上面的grok解析之后,cisco_message内容如下:
1
| Group <ssl-policy> User <xiaoming> IP <116.87.87.164> AnyConnect parent session started.
|
分别是用户所在安全组,用户名,用户拨入VPN时的源IP地址,使用正则表达式提取到这三部分内容。
这里推荐使用kibana内置的dev tools调试表达式,直接预览最终效果
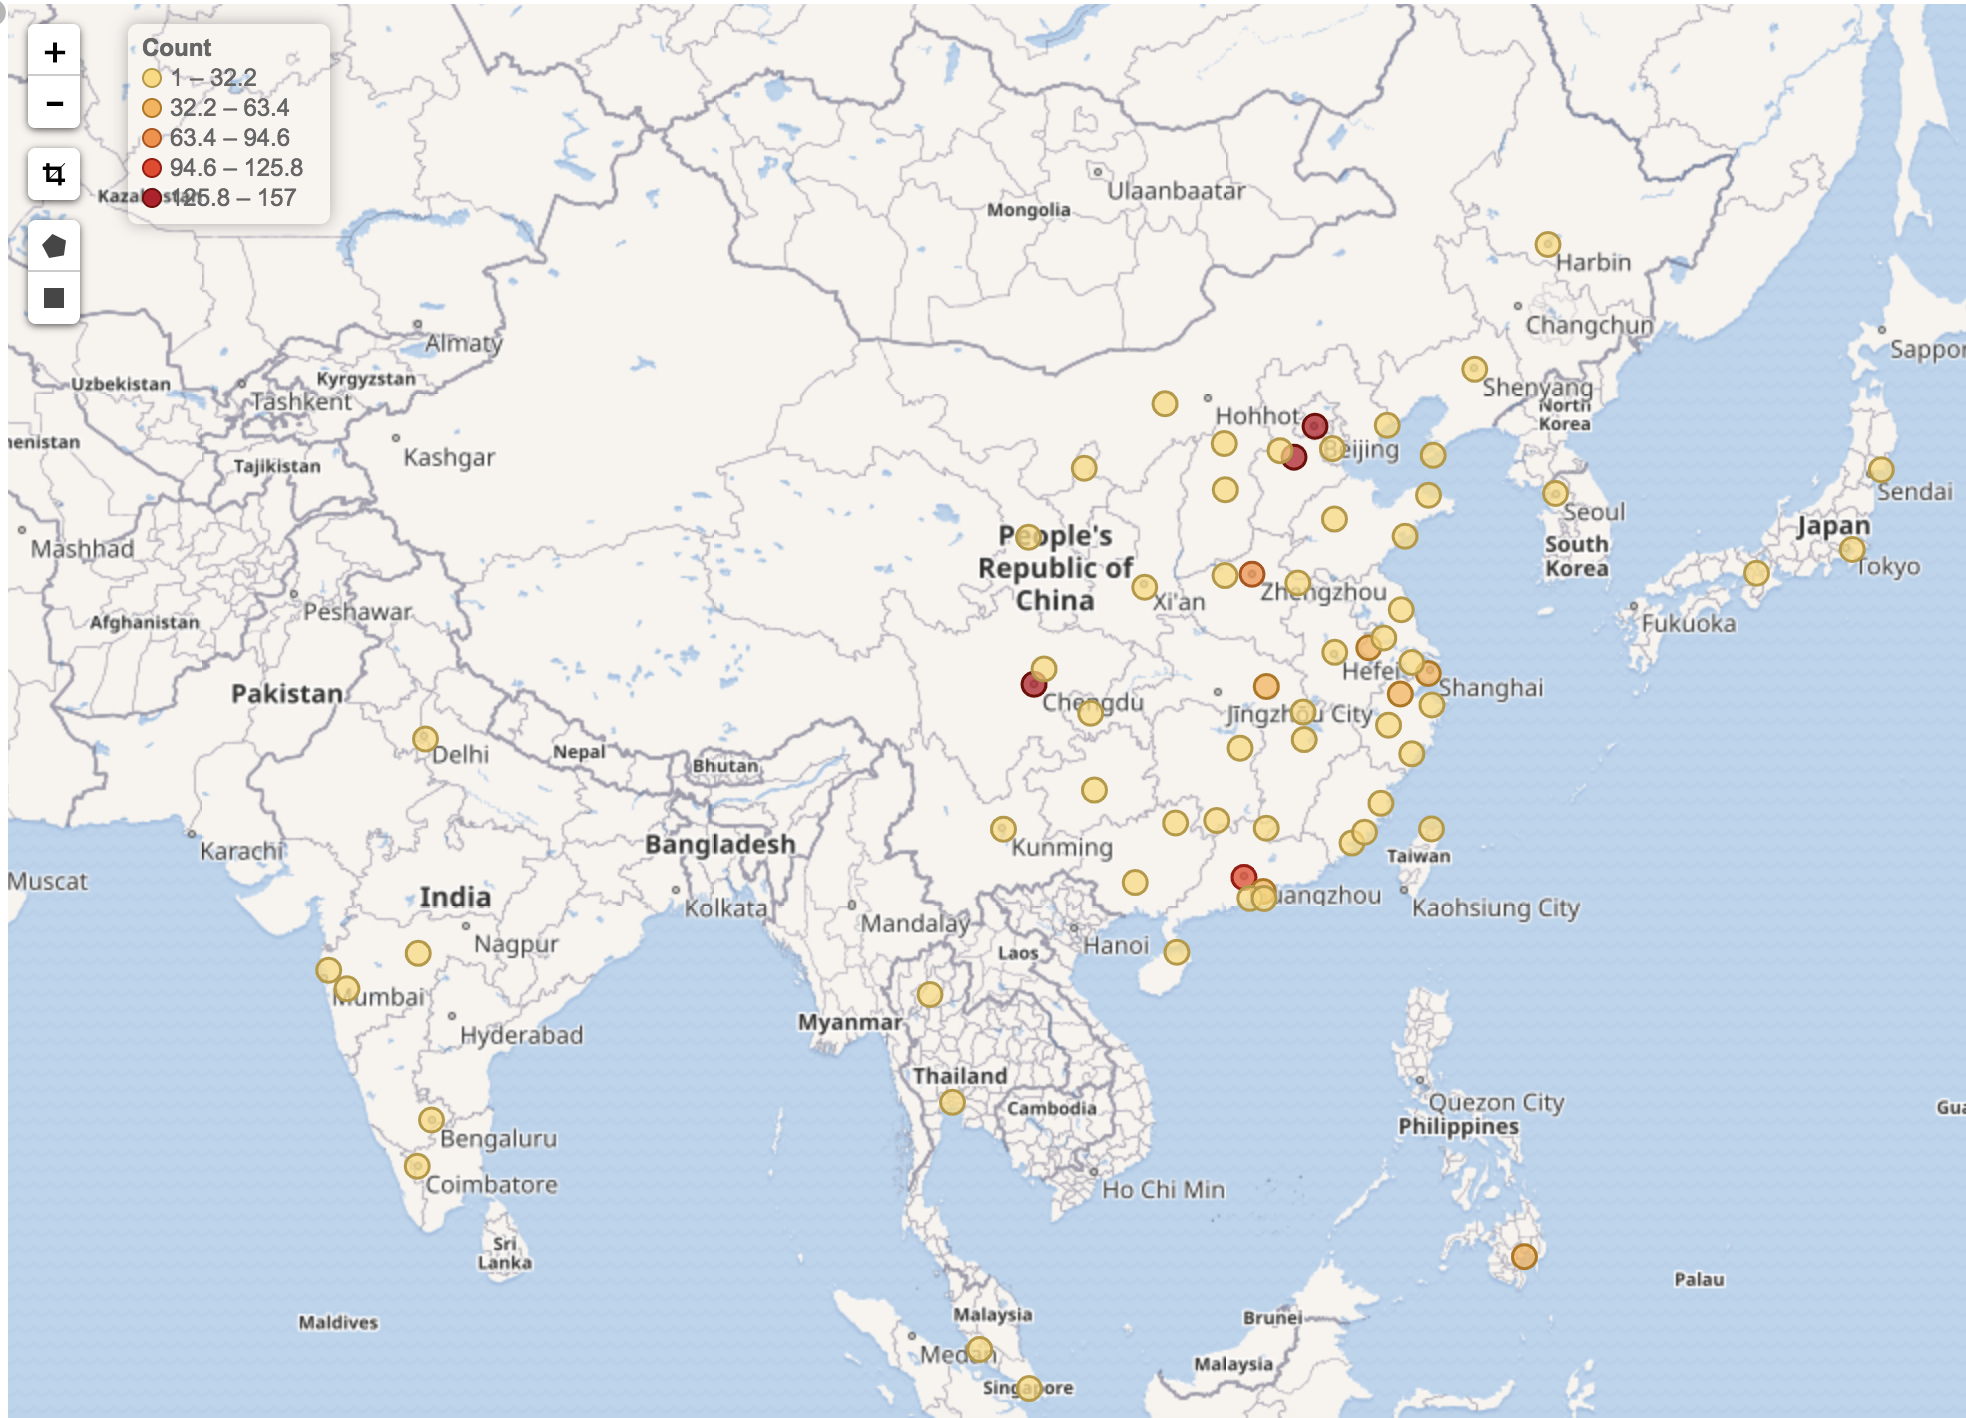
拿到用户拨入VPN时的remote-ip地址ipaddr,传给geoip的source,解析出对应的geo信息:
1
2
3
4
5
6
7
8
9
10
11
12
13
14
15
16
17
18
19
20
21
| "geoip": {
"country_code3": "SG",
"country_name": "Singapore",
"region_code": "01",
"continent_code": "AS",
"timezone": "Asia/Singapore",
"country_code2": "SG",
"region_name": "Central Singapore Community Development Council",
"city_name": "Singapore",
"longitude": 103.8558,
"ip": "116.87.87.164",
"latitude": 1.2931,
"coordinates": [
103.8558,
1.2931
],
"location": {
"lat": 1.2931,
"lon": 103.8558
}
},
|
坑:
需要注意的是,如果想在kibana的map中显示,那么location的字段类型不能是string,需要转换为geo_point类型。实际上,logstash默认的模板中已经支持了对geoip中location类型的转换,只需要在logstash output中输出到es的索引名字是logstash-*
详细请看elk官方博客分析
* Date
当产生日志的host设备时间不准确时可以也考虑添加date,使用接收日志时的logstash server时间作为日志时间戳。
1
2
3
4
5
6
7
8
| date {
match => ["timestamp",
"MMM dd HH:mm:ss",
"MMM d HH:mm:ss",
"MMM dd yyyy HH:mm:ss",
"MMM d yyyy HH:mm:ss"
]
}
|
Date是从第一个grok过滤器获取时间戳值,并将其设置为放入elasticsearch时的timestamp。
es默认使用接收到log的时间作为event发生的时间,而设置了date之后,可以用log中timestamp作为记录依据。
所以,在ASA上配置ntp十分有必要。
output:输出
1
2
3
4
5
6
| output {
elasticsearch {
hosts => ["172.17.40.52:9200"]
index => "logstash-asa-%{+YYYY.MM.dd}"
}
}
|
没什么好说的了,host是指定es的地址,index指定索引名,坑已踩。
sysLog日志的收集部分就是这样了,分析的话,等我再研究下看看有没有什么好分享的。
参考文档:
[1] Send Cisco ASA Syslogs to Elasticsearch Using Logstash
[2] Using Logstash, Elasticsearch and Kibana for Cisco ASA Syslog Message Analysis.
[3] 关于geoip的配置 - ELK全家桶
[4] ELK利用GeoIP进行地理定位
[5] Visualize Geo location of log using Elasticsearch + Logstash + Kibana
[6] What are Syslog Facilities and Levels?
[7] Cisco ASA 5510 VPN login history